Introduction

This blog is a user's perspective on the Micro Four Thirds camera system. Read more ...

Lens Buyer's Guide. Panasonic GH4 review.

My lens reviews: Olympus 9mm f/8 fisheye, Lumix G 12-32mm f/3.5-5.6, Leica 25mm f/1.4, Lumix X 12-35mm f/2.8, Lumix X 35-100mm f/2.8, Sigma 30mm f/2.8, Sigma 19mm f/2.8, Lumix X PZ 14-42mm f/3.5-5.6, Lumix X PZ 45-175mm f/4-5.6, Olympus M.Zuiko 45mm f/1.8, Panasonic Lumix G 100-300mm f/4-5.6, Panasonic Leica Lumix DG Macro-Elmarit 45mm f/2.8 1:1 Macro, Panasonic Lumix G 45-200mm f/4-5.6, Panasonic Lumix G 20mm f/1.7 pancake, Panasonic Lumix G 14mm f/2.5 pancake, Panasonic Lumix G HD 14-140mm f/4-5.8, Panasonic Lumix G HD 14-140mm f/3.5-5.6, Panasonic Lumix G 8mm f/3.5 fisheye, Lumix G 7-14mm f/4, Samyang 7.5mm f/3.5 fisheye, Tokina 300mm f/6.3 mirror reflex tele, Lensbaby 5.8mm f/3.5 circular fisheye lens
The blog contains affiliate links. As an Amazon Associate I earn from qualifying purchases.

Monday 27 September 2010

Bokeh comparison @ 20mm

I have two lenses that can do 20mm, so I thought it would be interesting to compare their bokeh. Both the Panasonic Lumix 20mm f/1.7, and the Panasonic Lumix 14-140mm f/4-5.8 zoom comprise the 20mm focal length. Apart from this, they are of course very different. At f=20mm, the superzoom has a maximum aperture of f/4.4, which is quite a bit smaller than the f/1.7 that the fixed 20mm prime can do.

To compare the lenses, I have taken the same picture with various apertures. The centre region is in focus, and the focus distance is around 60cm, just above the minimum focus distance for the 14-140mm superzoom lens.

First the picture with the Lumix 20mm f/1.7 at maximum aperture. The picture is rescaled and sharpened a bit.


Second, the same image taken with the Lumix 14-140mm at 20mm f/4.4:


Click for larger images.

The make the comparison more sensible, I have looked at 100% crops from the image at various apertures with both lenses (click for larger image):


And here are 100% crops from another region of the image. It was a bit more windy in the second series, so the leaves were not always in the same spot.


Conclusion

It is not surprising that the bokeh for the 20mm prime lens is the best. For out of focus highlights, the bokeh is pretty even, but has hard edges. On the other hand, it is not entirely round, especially when stopping down. All in all, the bokeh is pleasant, and has no significant ringing. The superzoom bokeh is a bit "dirty".

You'll also note some differences in sharpness. Note, however, that a higher ISO value was used for the f/8 and f/11 images for the 20mm prime lens. So some lack of sharpness could be due to using a higher ISO. It can still be noted that the superzoom lens appears very sharp.

The 14-140mm also has more flare, which is due to it's more complicated construction. The 14-140mm lens has 17 lens elements in 13 groups, while the 20mm pancake only has 7 elements in 5 groups. Generally speaking, the less number of lens elements, the less problems with flare you're likely to see. Of course, many other factors also affect flare.

Thursday 23 September 2010

Lumix 12.5mm 3D lens

Ok, so this lens has just been announced, and obviously I have not tried it. So this is based on what I have read about the lens so far.

Since writing this, I have made a review based on using the actual product.


Contrary to what some people say, I actually find this lens pretty interesting. Some say that Panasonic should rather spend the time developing "real" lenses. However, I think that this lens might have some real creative potential, and it also serves to bring more interest into the Micro Four Thirds system. So what's not to like?

Focal length

The lens is specified to have a focal length of 12.5mm. However, don't let that fool you into believing that this is a wide angle lens. Far from it. The two separate lenses project image circles that are smaller than the full sensor. Hence, there is an additional crop factor to take into consideration.

The field of view is comparable to a 65mm lens on traditional 35mm cameras, corresponding to 32.5mm on Four Thirds cameras. Hence, this is a long normal lens. Observing that 32.5 / 12.5 = 2.6, we can conclude that this lens has an additional crop factor of 2.6, beyond the crop factor of Four Thirds lenses, which is 2.

On the Panasonic Lumix GH2, the lens produces stereo images of 2048x1536 pixel resolution. With the GH2 having 4602x3456 pixels, this means that each of the two stereo images comprise 20% of the image sensor. Here is an illustration:


Aperture

With a fixed aperture of f/12, the lens gives a deep depth of focus. Which is good for a lot of applications. On the other hand, at f/12, you will need to push the ISO up unless being outside on a sunny day.

3D effect

Obviously, the 3D effect is achieved by having the two separate lenses seeing slightly different perspectives. The lenses appear to be very simple constructions, with four lens elements in three groups.

The stereo base, the offset between the two lenses, is 10mm, corresponding to about half of the sensor width. This looks like a very short distance, and I am unsure if any significant 3D effect can be achieved with this short lens offset. Perhaps the 3D effect can be boosted in post processing?

Usage on non-compatible cameras

When used with a 3D compatible Micro Four Thirds camera, you can probably use the lens in a seamless fashion. The viewfinder will probably not show a confusing picture like the illustration above, but rather one of the subsections, to make framing easier. Compatible cameras at the moment include Panasonic Lumix G2 and GH2.

With an older, non-compatible camera, like G1, GF1, etc, I'm guessing the lens can be used like all others, with the exception that the two lenses will not illuminate the whole sensor. You may need to set the autofocus point to somewhere off centre, for that reason. Perhaps you will also need to change the exposure mode, since parts of the sensor are not exposed.

Of course, if the lens is used with non-compatible camera, i.e., anything older than the G2 or GH2, then you must convert the image into 3D in post processing.

Sunday 19 September 2010

Using the Lumix 20mm as portrait lens

A portrait lens has two main properties. First, the focal length is fairly long, so that you can take a picture of a face at sufficient distance to avoid distortion. Second, the aperture is large, so that you can focus on a face and have the background out of focus.

Typical high end portrait lenses for film based cameras are 85mm f/1.4. The focal length corresponds to around 42-45mm for Micro Four Thirds. Many zoom lenses available for Micro Four Thirds will give you this focal length option. However, the largest aperture of these zoom lenses is generally much smaller than f/1.4.

One prime lens which comes close is the Lumix Leica 45mm f/2.8 macro. However, while this lens has a larger aperture than the zoom lenses, it is still far from f/1.4, and I am sure some will find it limiting for portrait usage.

Another lens comes close in the aperture department. It is the Panasonic Lumix 20mm f/1.7 pancake. However, this lens is quite a bit wider than most portrait lenses. So can you use it for portraits?


Let's take a look. When talking about portraits, let's say that we mean a picture in which the face fills the majority of the frame. When using the Lumix 20mm pancake lens, this is what we get, when going close enough to fill the face into the frame:


As you can see, the face is distorted. The nose and chin looks too large. This is due to getting very close to the face. The distortion is not a property of the wide lens. The distortion is related to the distance to the face. The closer the distance, the more distortion. With a longer focal length, you can stand at a longer distance when photographing, to avoid distortion.

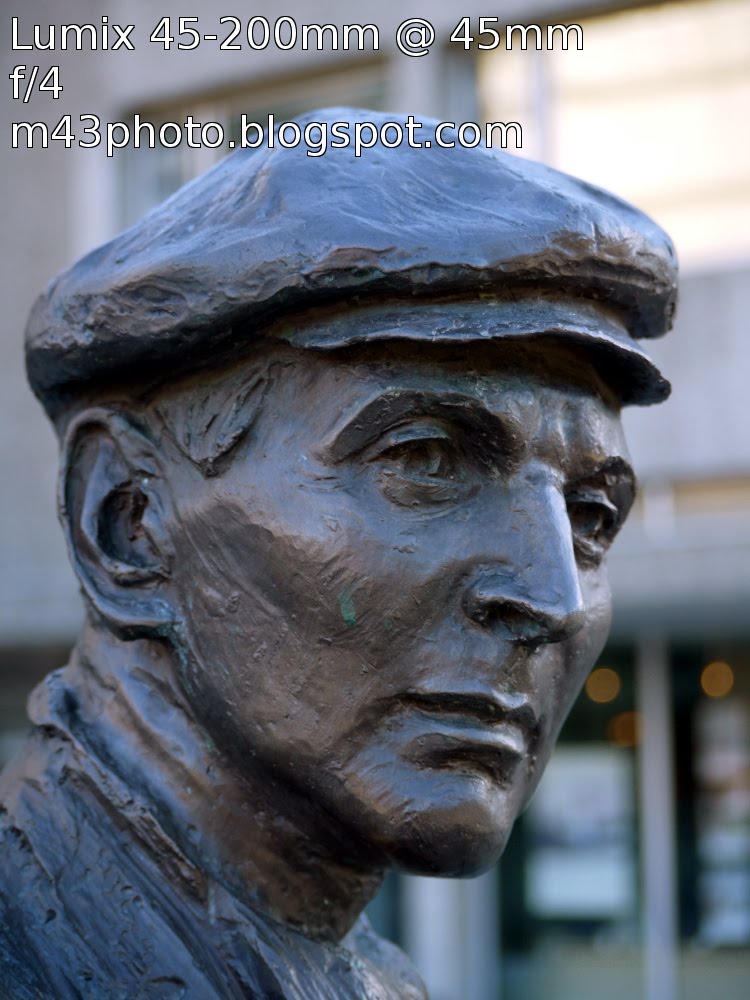
So let's try a longer focal length. Here is the same face filled into the frame using the Lumix 45-200mm f/4-5.6 at 45mm:


The effect is very clear: 45mm is sufficient to get a proper perspective. The nose and chin now looks natural, and not artificially large, like in the picture taken at 20mm.

This picture was taken at 1m (3.3 feet) distance, which is the closest you can get with the 45-200mm lens. This is probably no coincidence. I'm guessing Panasonic designed the lens so that it could be used to take a headshot at the shortest focal length.

It is also interesting to see that the out of focus discs (bokeh) are about similar sizes in the two images. This means that f/4 at 45mm gives about the same background blur as f/1.7 at 20mm, when filling a face into the entire frame. Of course, the 20mm image was taken at a closer focus distance.

In a previous paragraph, I said that the distortion is related to the distance to the subject. So the solution is very simple: When using the Lumix 20mm pancake lens, take a step backwards. With the same distance as in the 45mm image above, the perspective should also be the same. Here is the outcome when using the 20mm lens at 1m (3.3 feet) distance:


In this example, there is no apparent distortion. However, the downside is of course that the face only fills a part of the frame. Also, the background is less blurred, since the focus length was larger.

The Lumix 20mm lens is very sharp. Especially in the centre region. So what you can do, is to crop the centre out of the image. Here is what I get using that method:


Of course, you might want to include a bit of background, and not crop as tightly as I have done here.

Conclusion

So can you use the Lumix 20mm lens for portraits? Yes, but don't stick the camera in the face of the subject. At a distance of about 0.7m (2 feet) or more, the face distortion should not be noticeable. If you need to, you can crop off a bit of the borders, to get a closer portrait.

Of course, you could take a so called "environmental portrait", in which you don't just shoot the face, but include some more of the person, and some elements around him or her. In that case, it makes good sense to use the 20mm lens. In fact, I'd say the Panasonic Lumix 20mm f/1.7 pancake is a perfect lens for environmental portraits.

Here is an example environmental portrait taken with the GH2 and the 20mm f/1.7 lens.  The image parameters are: f/2, 1/60 second, ISO 1600.


You could even use the Lumix 14mm f/2.5 wide angle prime lens for environmental portraits. As long as you keep a distance to the face of around 2 feet or more, you should not get any excessive distortion. On the other hand, if you photograph a sitting person head on, his knees will look abnormally large this way, due to the perspective.

Saturday 11 September 2010

Lumix 20mm distortion correction

One of the key features that separates quality optics from the cheaper variants, especially for wide angle lenses, is the the handling of distortion. In this respect, the Panasonic Lumix 20mm f/1.7 pancake lens is special, since in fact it features quite a bit of barrel distortion. However, this distortion is corrected by software inside the camera, so the user will never notice the fact in the first place.

However, the RAW files can be opened with third party software, to reveal the true image as captured by the sensor. In this case, I used UFRaw to convert the image to JPEG. Below is the original JPEG out of camera (left) and the RAW image with distortion uncorrected (right). The images were rescaled and sharpened. Click for larger images.

Out of camera JPEGUncorrected, from the RAW file


For these images, I used the 3:2 aspect ratio feature of the Lumix GH1 camera.

As you can see, there is some distortion in the right image. To correct it in The Gimp image processing software, around -13.5 Lens Distortion adjustment is needed.

Due to the distortion correction, all of the sensor surface is not used in the final image. Hence, the image area from the border is lost, as the image is adjusted and rescaled back to 12 megapixels.

In the image below, the area outside the white box corresponds roughly to the pixels lost during the distortion correction:


This means that when using the Lumix 20mm lens, about 7% of the sensor area is lost. The 12 megapixel sensor becomes 11 megapixels using the automatic distortion correction. The end user may never notice, however, as the output image is converted back to 12 megapixels anyway.

The upside of this is that when photographing non-straight shapes, you can probably get away with using the uncorrected image. This means that you gain some details in the borders, and a wider effective angle. For example, if you are photographing nature, flowers, people, animals, etc.

Most Micro Four Thirds lenses employ software distortion correction. Kit lenses like the Panasonic Lumix G 45-200mm f/4-5.6 and the Panasonic Lumix G HD 14-140mm f/4-5.8 do. One notable exception is the Panasonic Leica Lumix DG Macro-Elmarit 45mm f/2.8 1:1 Macro, which has all the distortion correction done optically.

Sunday 5 September 2010

Dual focus

In macro photography, the depth of field is commonly a constraining factor. At high magnification, even using f/16 might not give enough depth of field, if the object is not narrow. And closing down the aperture beyond around f/11 is not adviceable due to diffraction.

One way to get around this, is to take more than one photo, and change the focus distance between them. The photos can then be merged in photo editing software, to yield one single photo where more than normal is in focus. This technique is some times referred to as focus stacking.

When having a lot of photos to merge, it is best to use some software to do the merging automatically, since it involves a lot of tedious, manual work. However, when only merging two photos, it can be done quickly in any photo editing software that feature layers, e.g., The Gimp.

Here is an example. I took this picture of two LEGO minifigures. The figures were placed in a simple macro soft box to get even lightning. I used the Panasonic Lumix Leica 45mm f/2.8 1:1 macro lens for the image, and placed the autofocus area on the figure faces for focus. I used f/5.6, which is far from enough from getting both figures in focus at the same time.

Photo 1: Left figure in focus:


Photo 2: Right figure in focus:


Merging the two images is a matter of loading them both into the same image in two different layers, and then removing the out of focus areas. Note that some lenses will give a different field of view depending on the focus distance. Hence, you may need to rescale one (or more) of the photos when merging.

This merged image would have been impossible to take with only one exposure:

Wednesday 1 September 2010

Sharpness comparison, PL45 and ZD50

It's easy to find a lot of opinions about the Panasonic Leica Lumix DG Macro-Elmarit 45mm f/2.8 1:1 Macro lens and the Olympus Zuiko Digital 50mm 1:2 Macro lens. Generally, I have seen people saying that the 45mm is less sharp, but has better bokeh.


I have already compared the bokeh of the lenses, and while they are both completely adequate, is is probably true that the Leica Lumix 45mm has more smooth bokeh.

So I decided to compare the sharpness as well. For this study, I took a picture of a woolen scarf with some texture using both lenses. Here are the whole pictures, scaled down and sharpened a bit. Click for larger images.

PL45mm, f/2.8ZD50mm, f/2.8
PL45mm, f/5.6ZD50mm, f/5.6


I focused on the centre of the image. This was done manually for both lenses.

These images are not very well suited for judging the sharpness, though. We need to study some closeups of parts of the image. Here is the centre of the images, shown in 100% view, meaning that each pixel off the sensor becomes one pixel on the image. These images were not sharpened. Click for larger images.


f/2.8


f/5.6


Comparing the f/2.8 images might pose some problems. The lenses could be focused slightly differently. With the narrow depth of field at this aperture setting, this could lead to areas being out of focus in different ways. However, looking at the areas that are in focus, I think we can see that the contrast is a bit higher in the Panasonic Lumix 45mm image.

For the f/5.6 image, all of the cropped images should pretty much be in focus, with the wider depth of field. Again, I think it looks like the sharpness and contrast is a bit higher in the Panasonic Lumix 45mm image. But people might judge these images subjectively in different ways.

Conclusion

I think it looks like the Panasonic Lumix 45mm macro is slightly more sharp in this example. We should keep in mind that the Panasonic Lumix 45mm is more of a dedicated macro lens than the Olympus 50mm. After all, the PL45 has got higher maximum magnification. Also the Olympus 50mm has got a larger aperture, suggesting that it is intended to be used as a portrait lens as well. Hence, it could be that the Olympus 50mm is optimized for focus somewhat further away than the Panasonic Lumix 45mm is.

It should be noted, however, that in this example, both lenses are producing images that are sharp enough for most conceivable uses. Judging their relative sharpness in this case is very close to nitpicking.

In addition to this test, I have also studied the sharpness of the lenses at a longer focus distance.