Introduction

This blog is a user's perspective on the Micro Four Thirds camera system. Read more ...

Lens Buyer's Guide. Panasonic GH4 review.

My lens reviews: Olympus 9mm f/8 fisheye, Lumix G 12-32mm f/3.5-5.6, Leica 25mm f/1.4, Lumix X 12-35mm f/2.8, Lumix X 35-100mm f/2.8, Sigma 30mm f/2.8, Sigma 19mm f/2.8, Lumix X PZ 14-42mm f/3.5-5.6, Lumix X PZ 45-175mm f/4-5.6, Olympus M.Zuiko 45mm f/1.8, Panasonic Lumix G 100-300mm f/4-5.6, Panasonic Leica Lumix DG Macro-Elmarit 45mm f/2.8 1:1 Macro, Panasonic Lumix G 45-200mm f/4-5.6, Panasonic Lumix G 20mm f/1.7 pancake, Panasonic Lumix G 14mm f/2.5 pancake, Panasonic Lumix G HD 14-140mm f/4-5.8, Panasonic Lumix G HD 14-140mm f/3.5-5.6, Panasonic Lumix G 8mm f/3.5 fisheye, Lumix G 7-14mm f/4, Samyang 7.5mm f/3.5 fisheye, Tokina 300mm f/6.3 mirror reflex tele, Lensbaby 5.8mm f/3.5 circular fisheye lens
The blog contains affiliate links. As an Amazon Associate I earn from qualifying purchases.

Tuesday 30 March 2010

Panasonic GH1 exposure, nightscenes

I have noted that the Panasonic GH1 consistently gives too dark exposures in night scenes, or more generally, in scenes with high contrast, large difference between the light and dark parts of the image.

Here is an example scene, shot with two different cameras. Panasonic GH1 top, and Pentax K10D bottom.

Panasonic GH1

Pentax K10D

Both cameras were set in "P" mode, auto white balance, and multi segment exposure metering. The field of view was 200mm (film camera equivalent), with aperture f/6.7, ISO 400. The JPEG images were used straight from the camera, with rescaling and a little bit of sharpening.

As you can see straight away, the Pentax exposure is much more usable, even if the white balance could have been better. But in terms of white balance, this is a very trick situation anyway, with artificial lights.

Let's compare the JPEG histograms, taken from the Gimp image processing software:

Here it is very apparent that the Pentax has a more useful exposure. The Panasonic exposure appears to be designed to avoid blown highlights, while the Pentax exposure puts more weight on preserving details in the shadows.

Highlight details

Let's see how the highlights compare. Here are 100% crop from the same area in both pictures:

Panasonic GH1

Pentax K10D

As is apparent, Panasonic exposes less, and hence is able to preserve more details in the highlights. However, to achieve this, a lot of detail in the darker parts of the picture, which makes up the most of the area, is lost.

Appendix

The lenses used were the Panasonic Lumix G HD 14-140mm f/4-5.8 @ 100mm, and the Pentax DA* 50-135mm f/2.8 @ 135mm. The camera was on tripod during both exposures. The exposures were around a couple of seconds, with image stabilization turned off. You can see that the Panasonic lens is much sharper, even if it is less stopped down. This is quite a feat for a 10x zoom. On the other hand, the Pentax lens is a faster lens, which implies other compromises in the design.

Tuesday 23 March 2010

Four Thirds lens compatibility

Panasonic Lumix Micro Four Thirds (MFT) cameras can use all Four Thirds (FT) lenses, provided that you use an adapter. You can use either the Panasonic DMW-MA1, or Olympus MMF1/MMF2 adapters.

However, you should note that not all FT lenses will autofocus on Panasonic MFT cameras. Only fairly recent lens designs that are prepared for contrast detection auto focus (CDAF), will work. The compatible FT lenses are


These lenses will autofocus on Panasonic Lumix MFT cameras, like G1, GH1 and GF1.

Newer Panasonic cameras like GH2, G2 and G10 feature some improved autofocus functionality using some FT lenses. For example, the GH2 can autofocus using the Olympus 50mm Four Thirds lens, but the focus is very slow. The Panasonic G1, GH1 and GF1 will not autofocus this lens at all.

All Olympus MFT cameras can autofocus with all FT lenses, so Olympus camera users can ignore this list. This also goes for Panasonic FT lenses used on Olympus MFT cameras. The autofocus can be very slow with some FT lenses, though.

For those combinations of lenses and cameras where autofocus works, you will still experience slow autofocus with FT lenses on both Panasonic and Olympus MFT cameras. I have made a comparison of autofocus speeds using some MFT and FT lenses on the Panasonic GH1. Also, a similar comparison for the Panasonic GH2.

Even if autofocus does not work on some camera/lens combinations, other functions like aperture control will still work. And using manual focus is not that difficult. Here is an illustration of using manual focus with Olympus 50mm f/2 macro on Panasonic Lumix GH1.

Friday 19 March 2010

Pentax PK to Four Thirds adapter

Previously, I've looked at an adapter for Nikon F lenses. Let's continue with a Pentax K-mount lens adapter.

This ring is an adapter for using Pentax K lenses on a Four Thirds mount. It is a crude adapter ring, with no aperture stop down functionality, and no electrical contacts. The adapter adds 7mm of spacing. The packet reads "Olympus 4/3-PK". The adapter can be bought for around US$15 on various auction sites.

Naturally, this adapter is made for use with a Four Thirds mount, so it cannot be put directly on a Micro Four Thirds camera. You will need another adapter stacked between them. I used the Panasonic DMW-MA1 Four Thirds to Micro Four Thirds adapter, but the Olympus MMF1 would have done the same job, since they are functionally similar.

Here are both adapters laid out, with the Pentax 50mm f/1.4 lens behind them.

When stacked together, the adapters allow for mounting Pentax K lenses to a Micro Four Thirds camera. You can see this done in the picture below, with the Pentax 50mm f/1.4 mounted to a Panasonic Lumix GH1.

Note that Pentax K lenses with an aperture ring are most suited for this use. If there is no aperture ring on the lens, then it is impossible to use an aperture smaller than the max, which is f/1.4 in this case. That makes the lens difficult to use. Focusing must be done manually, of course.

There are also adapters for Pentax K lenses to be mounted directly on Micro Four Thirds cameras. They tend to be somewhat more expensive, since they are larger, and also because they were introduced more recently.

The two legacy adapters I have explored so far, Nikon F and Pentax K, represent merely scratching the surface. There are adapters that can be used to mount a wide variety of lenses to Micro Four Thirds cameras. From high end Leica M lenses, to crude surveillance camera lenses.

Sunday 14 March 2010

Macro extension rings

Using macro rings has always been a cheap trick to improve the close focusing distance of a lens. You'll notice that when focusing from infinity to a closer distance, the lens elements usually move away from the camera and the sensor. Some exceptions from this are lenses with internal focusing, or back focusing.

So what happens if you move the lens even further from the camera than what's possible with the focus ring? It turns out that this gives you an even closer focus. So what a macro extension ring simply does, is allow you to mount the lens further from the sensor, translating the focus range of the lens so that it can be used for close up work.

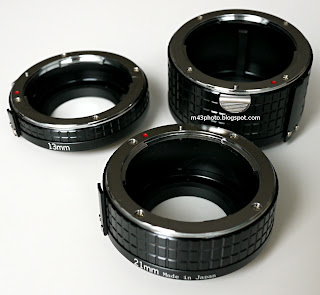
There are no macro rings officially available for the Micro Four Thirds mount yet. However, when using legacy lenses on an adapter, there are a wide range of macro rings to try out. Here is a set of Nikon macro rings from Jessop:

These rings contain some mechanical coupling functions to allow for the aperture information to be transfered to the camera, and for the camera to automatically stop down the lens before taking a picture. However, these functions only work on AIS capable cameras. In today's Nikon lineup, only the top models have retained this functionality.
When using the rings on a crude adapter, you can certainly forget about this functionality. You'll need to focus using a large aperture, and then alter the aperture ring manually prior to pressing the shutter release, if you want to stop down the aperture.
The thickness of the rings are 13mm, 21mm, and 31mm. When stacked in different combinations, they can give these offset distances: 13mm, 21mm, 31mm, 34mm, 41mm, 52mm and 65mm.

Normally, these rings would go between the camera mount and the lens. When using an adapter, however, they go between the adapter and the lens, as in this picture:
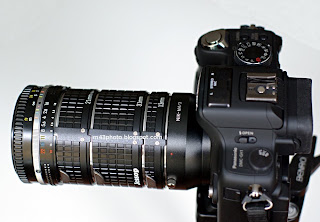


A Nikon-Micro Four Thirds adapter (marked with "Nik-M4/3") is mounted to the Panasonic Lumix GH1 camera, and all the macro rings are stacked between the lens and the adapter. The lens is a Nikkor 50mm f/1.8 AIS. Here is a video showing how to attach the adapter and lens to the camera.

When using all the macro rings above, I took this picture of a measure band, to find the largest magnification. It was taken at 4/3 aspect ratio, in which case the active sensor is 18mm wide. Since the photographed item is 13mm wide, this gives an enlargement of 18:13, or 1.4:1. This could also be expressed as 1.4x.


For comparison, the Panasonic Leica DG Macro-Elmarit 45mm f/2.8 macro lens is capable 1:1 enlargement (1x), which means that the largest enlargement possible would have yielded 18mm of the measurement band. The macro rings and Nikkor 50mm lens can be used to make more enlargement than the dedicated Panasonic Leica macro lens.

Using the configuration above, with 65mm extension of the lens, I was able to take this close up picture:


I stopped down the aperture to f/8 for more depth of field.

For comparison, I photographed the same object using the Olympus Zuiko 50mm 1:2 macro lens. This is the closest picture I could take with the Olympus lens, also at f/8, and with an enlargement of approximately 1:2:


Macro rings for legacy mounts can be bought cheaply on various auction sites. There are also extension tubes and bellows, which are functionally similar, but more flexible in use. Another way to achieve closer focusing is to use a reverser ring, essentially a second lens mount to be screwed into the front lens filter thread. Using a reverser ring, the lens can be mounted reversed, in which case it can be used for macro. Lenses with a normal focal length are most commonly used this way.

Please note that macro lenses are special in that the lens formula is designed for close up photography. Using ordinary lenses on extension rings or bellows is not going to give as good results, since those lenses are not designed for close focusing.
Here is another example picture using the full 65mm macro ring extension:


For this picture of a garlic, I used f/22 to achieve enough depth of field. Using such a small aperture is going to give some blurring at pixel level due to diffraction. However, in this case, I valued more depth of field higher than some dullness at the highest magnification. The diffraction effect is barely visible at 100% view.

Friday 12 March 2010

Third party hood for the Lumix 20mm f/1.7 pancake

The Panasonic Lumix G 20mm f/1.7 pancake is a popular lens, and for a good reason. It is compact, sharp, focuses reasonably fast, and has a good maximum aperture. One drawback, however, is that there is no supplied hood in the box.


A hood is useful for keeping out stray light, light coming from outside of the field of view, which could otherwise cause flare in the image. A hood also protects the front lens element against objects touching it accidentally.

The filter thread is 46mm, and you can mount screw in hoods. One hood is easily available on various action sites for around US$10. It is made out of anodized aluminum, with a matte black finish to keep out stray light. You can find this by searching for, e.g., "46mm hood summicron".


This second picture shows that the inside of the hood is ribbed, for extra protection against stray light.


Front lens cap
When screwed into the filter thread of the lens, you cannot use the standard front lens cap. However, you can use a 55mm front lens cap inside the hood, as illustrated below, mounted on the Panasonic Lumix GH1 camera.


Vignetting
Originally made for the Leica Summicron 28mm, it is designed for a wide angle field of view. The Lumix 20mm has a field of view corresponding to a 40mm lens on a traditional film camera, which is narrower than what the hood is designed for. Hence, extra vignetting due to light loss in the corners should in theory not be a problem. Let's check this, however.

The image below consist of crops of the upper right hand corner of two pictures of the sky, taken with and without the hood mounted to the lens. Apart from the hood, the image parameters are the same.

As you can see, the amount of vignetting is roughly the same in both images, so using the hood is safe.
If you add a filter between the lens and the hood, you may need to check for vignetting again. The extra spacing of the filter will cause the hood to extend longer relative to the front lens element, and thus may cause vignetting.
Other lenses

The 46mm screw in hood can also be used on the Panasonic Leica DG Macro-Elmarit 45mm f/2.8 1:1 Macro lens, which shares the same filter thread diameter.

The to be launched 14mm f/2.5 pancake lens will also feature a 46mm filter thread diameter. However, with a 28mm field of view, this hood could potentially cause vignetting, so be sure to test before using it.
Other options
This lens hood adds significant bulk to the lens, contrary to the idea of a pancake lens in the first place. Another more slim option, is to use a step down ring as a lens hood.

Sunday 7 March 2010

Canon ion 251 review, part 4 (picture quality)

The only way to access the images on the camera disk, is to connect it to a TV set, or to a digitizer card. I don't have either, so I connected it to my monitor, and photographed it. The images were then corrected for aspect ratio, and rescaled.


Here are some example images:

Conclusion

The concluding remark must be that this camera is not recommended. It shows that the consumer digital cameras have come a long way during the last twenty years.

Another remark is that this is not really a digital camera at all. The CCD captures analogue images, and the images are stored on analogue magnetic disks. The image is probably never converted to digital inside the camera at all.

Go back to part 3, in use
Go back to part 2, the camera
Go back to part 1, the contents

Canon ion 251 review, part 3 (in use)

Holding the camera in your hand is somewhat awkward, and not very ergonomic.


Sadly, the rechargeable battery did not function, so I was limited to using the wired battery eliminator, which limited my testing of the camera.

Taking pictures

The following video sequence shows the camera being turned on to "REC" mode. This triggers the camera to count through the 50 frames on the disk backwards, to find the first vacant spot. Having found this, the camera is ready for taking pictures.

When depressing the release shutter half way, the disk starts spinning, getting ready to record your image. Pressing it fully, triggers the shutter and records the image.

The "Mode" button cycles through "Single", "Contionous", and "Self timer".

There is not autofocus at all, you'll just have to hope that the subject is reasonably in focus.

In the viewfinder, there is very little information. There is a flash ready LED indicator, and when using the macro mode, there is a small, red parallax correction tab on the right hand side of the viewfinder.

Showing pictures on a monitor

The camera has no picture display at all. To view the pictures you have taken, you need to connect the camera to a TV set, or, as in my case, to a computer monitor. The camera is connected to the Composite Video input on the monitor.

After putting the camera in "PLAY" mode, you can use the arrow buttons to flip through the 50 images on the disk. In this mode, you can also erase individual images.


>>>Go to part 4, image quality

Go back to part 2, the camera
Go back to part 1, the contents

Saturday 6 March 2010

Canon ion 251 review, part 2 (the camera)

Featuring a 200K pixel 1/2 inch CCD sensor with 100 ISO sensitivity, the Canon Ion 251 is a dated camera. At the time of it's launch in 1988, though, it was a unique product: A compact still image camera capable of recording images on 2 inch floppies.

It features an 11mm f/2.8 fixed focal lens, and shutter speeds range between 1/30 to 1/500 second. The field of view corresponds roughly to that of a normal lens. There is a built in flash on the front.

The top view shows most of the camera controls. From left: Compensation button for taking pictures against the sun, mode/erase button, a display indicating the frame number (1-50), yellow buttons for selecting the picture frame number.

The left of the two slider switches is also used as the main power button: "Lock" turns the camera off. "Play" is used to display pictures across the video output, while "Rec" is the picture taking mode.

The other slider switch is used to select the flash mode. Finally, there is the yellow shutter release button, and on the far right side of the lens is a macro selector.

The following picture shows the disk drive door open, with a grey two inch video floppy visible.
In the underside view, the tripod mount is visible. This is not the usual 1/4 inch tripod thread, however, but a smaller non-standard thread.
On the left side, there is a battery compartment, for the supplied rechargeable lead acid battery, or for the battery eliminator.

The camera dimensions are: 140mm wide, 115mm long, and 35mm high, making it a pretty pocketable camera, even by today's standards.

The viewfinder is disappointingly small, with a 7mm opening. It does feature a diopter adjustment.


>>>Go to part 3, in use

Go back to part 1, the contents

Canon ion 251 review, part 1 (the contents)

The Canon Ion 251 was the European PAL version of the Canon Ion 250. It was launched in 1988, and had a Hi-band 1/2 inch CCD with 200K pixels. The Ion series was also called Q-PIC in Japan, and XAPSHOT in the US.

This was not marketed as a "digital camera", but rather as a "still video camera", which makes more sense, since it is built around a video camera CCD.

In the first part of the review, let's take a look at what's in the package. The camera came with a practical carrying case.


On the front side, there is a quick opening room for the camera itself, shown here inside a protective textile case:


The reverse side of the carrying case has a zipped flap covering accessories, mainly the charger and some cables.


All the contents laid out: The camera inside the protective case, a rechargeable lead acid battery, TV signal converter, battery charger, with an attached battery eliminator.


>>>Go to part 2, the camera

Monday 1 March 2010

Remote control for Panasonic Lumix G series

One drawback with the Panasonic Lumix G series, is that the cameras do not have any infrared receiver. So there are no simple wireless remote controls available. But there are some third party remotes that can be bought fairly inexpensively.

One of them is the "JJC JR series Infrared Controller". This one can be bought online.

In the package, there is one cord, one controller unit (lower right in the picture), one receiver unit (in the middle of the picture), two CR-2032 batteries, instructions manual and a small screwdriver.

The build quality of the items appears to be fairly poor. They do not feel like high quality items, far from it.

The set can be used in two ways, either as a wired remote control, or as an infrared remote control.

Using it as a wired remote control is fairly straight forward: Connect one end the cord to the microphone/remote control input on the camera, and connect the other end to the controller unit. When this is done, you can press the controller unit release button halfway to focus, and fully to trigger the shutter. There is also a function to provide delayed trigger on the controller unit.

If you want the wireless remote functionality, you also need the infrared receiver unit. Connect the cord to this unit, rather than the controller unit, as in the picture below. You can now use the controller unit just as when connected directly with a wire, provided that you point in the direction of the receiver.

Panasonic GH1 camera body with the Lumix 20mm f/1.7 lens and the remote receiver from JJC. The Lumix 20mm pancake lens has an optional third party 46mm screw in hood mounted.

Problems

However, the wireless remote does not operate as flawless as described above. Trough some trial and error, I found that when connected to the receiver unit, the camera will not respond to the remote control operations, unless it was previously used in wired mode. So to operate the remote control in wireless mode, you need to do the following:
  1. Turn on the camera.
  2. Connect the controller unit to the camera with the supplied cord.
  3. Operate some function with the controller unit, for example autofocus.
  4. Disconnect the controller unit from the cord, and connect the infrared receiver.
After having done this, you can use the wireless remote control as it is intended to work. If you turn off the camera, you must repeat these steps again for the remote function to work.

I have bought a second remote control, the Pixel RW-221 Wireless Remote Control. It is superior to the JJC JR unit tested above. The Pixel RW-221 remote has better build quality, works more intuitively and reliably, and simply gives better value for money.